Mikrotik Router is a router that has complete features. One feature that is quite popular and widely used of the Mikrotik Router itself is Hotspot. Do you know the difference regular internet sharing with Hotspot? You may often find a wifi internet signal in the password using WPA or WEP. You will be able to surf if you enter the password correctly. So anyone can access the wifi if know his password because the password is only one. Unlike the Hotspot method, in which most of the wifi hotspots are not in the password and the user can connect all will then be directed to a login page in the Web Browser. Each user can login with the username and password are different. Methods of this kind we often find in wifi Cafe, Schools, colleges, and other public areas.
Well, now we will discuss Tutorial Mikrotik Indonesia by trying create and configure the proxy as a Hotspot. But first you need to know what are the advantages of using Mikrotik Hotspot. By using Mikrotik as a Hotspot, you can configure the wireless network that can only be used with specific username and password. You can also take on the management of the user-the user. For example, set the total duration of the hotspot usage per user, limiting how much data can be downloaded by users, set what content may be accessed user, etc..
Okay, not you already know what are the advantages and features of hotspot mikrotik. Now Mikrotik Further Study abroad directly into his practice. We start with a basic configuration of its hotspot was yes.
1. Specify the interface to be created hotspot. Because we will make the hotspot via wifi then select wlan interface. Here I assume using wlan1. Enable wlan1 and use AP Bridge mode, enter the SSID name of your hotspot.
2. Give wlan1 interface IP address, for example 192.168.100.1/24[Admin @ MikroTik]> ip address add address = 192.168.100.1/24 interface = wlan1
Or it could be through Winbox, go to IP -> Address
3. Sekarang kita mulai membuat Hotspot untuk wlan1. Untuk lebih mudah
nya kita menggunakan wizard Hotspot Setup. Masuk ke menu IP -->
Hotspot --> Hotspot Setup
4. Select Hotspot Interface: wlan1 -> click Next
5. Further fill in the IP address of the wlan1 and check Masquerade Network. click Next6. Determine the range of IP addresses that will be given to the user (DHCP Server), eg: 192.168.100.10-192.168.100.254. So the user will be given an IP by DHCP Server automatically between the IP range.7. Selecting an SSL certificate. Select none only, click Next.8. SMTP Server IP Address to empty it. Click Next.9. Enter the DNS Server address. Fill it with its Google DNS servers: 8.8.8.8 and 8.8.4.4. Click Next.10. Enter the DNS name server for the local hotspot. If completed will replace the IP address of the wlan1 as the login page url. If not filled in the login page url will uses the IP address of the wlan1. Clear it, click next.10. Enter the DNS name server for the local hotspot. If completed will replace the IP address of the wlan1 as the login page url. If not filled in the login page url will uses the IP address of the wlan1. Clear it, clicknext.11. Hotspot has been created. Please you try to connect your laptop to your wifi hotspot.12. Open
any web browser and access, for example mikrotikindo.blogspot.com then
you will be redirected to the login page mikrotik hotspot.
13. Please try to login with username: admin and password: blank.14. If successful login means Hotspot is fine.15. To edit and add user please enter the IP menu -> Hotspot -> click the Users tab
Minggu, 04 Agustus 2013
Kamis, 11 Juli 2013
Guide How To Setting Modem Speedy - TP Link Restart
Setting
Modem Speedy which I will share this time to address the frustrations
of friends who can not access the internet because of certain problems
in the telecoms speedynya, whether it's forgotten admin password telkom
speedy or the other, if the parties wait for a fix of telecom and
setting re speedy models will take a long time, because usually these officers could not immediately come to help.Whatever
your problem when you want to reset the password speedy buddy, we need
to know is the Model Setting Telkom Speedy TP link that we have provided
that my friend must have given speedy password when first subscribe to a
speedy and phone number modem internet network friend have .If it's all taken care of, let's follow the Guide on How to Setting Modem Speedy Telkom under this:
First of all connect the modem to the computer / laptop using UTP cable, plug the connector also ADSL (telephone line) to the modem and the modem power cord and turn on your modem TP-Link.
Therefore, the default modem IP is 192.168.1.1 then change the IP address for your computer / laptop to 192.168.1.2
Definition and Types of Computer Network Topology
Definition
and Types of Computer Network Topology - Ariflaw Blog | On this
occasion I would mengshare little knowledge about the material TKJ
(Network and Computer Engineering), this time about the network
topology. This
material is usually given as 3 semesters until last, because this
material is the basic material of the Computer Network shall certainly
be mastered by children TKJ. Without length .. yukk we go into the material.

Computer Network TopologyNetwork topology is a way to connect computers to each other to form a network. Way that is currently widely in use is the Bus, Token Ring (Ring), Star (Star). Each of these has a characteristic topology, with its own advantages and kekurannya.Here Is a Computer Network Topology The most widely used:1. Bus Topology

Computer Network TopologyNetwork topology is a way to connect computers to each other to form a network. Way that is currently widely in use is the Bus, Token Ring (Ring), Star (Star). Each of these has a characteristic topology, with its own advantages and kekurannya.Here Is a Computer Network Topology The most widely used:1. Bus Topology
30 Types and How to Fix Computer Damage
30
Types and How to Fix Computer Damage is a summary of the general
damages that occurred there were computers then appeal or how you can
fix it. With this summary of you who have a computer may want to become a computer technician for yourself. At least if there is damage to the computer as listed below you can handle it yourself.1. Computers Do not Want to LiveThe fix:- Check the cable connection (from the power outlet to the power button on the PC)- Check that the stabilizer function or tdak (if using the stabilizer)- Check the power cable on the CPU- If you still do not want to live The issue may lie in the power supply or MB2. Computers Want But Do not Want Boot LifeThe fix:Recognize First Beep Beep:Beep 1 time only sign that a good condition computerBeep 1 time, There is a problem in the long memoryBeep 1 time long and short 3 times damage on VGA cardBeep 1 time long and 2 short times Damage in DRAM parityDamage continuous beep dimodul memory or video memory- Checks dianosa using software such as SiSoft Sandra, PC mark04, mark05 PC etc.3. Want Computer Booting But Always "Safe Mode" (to go into safe mode press F8)The fix:- Restart your computer- If still trouble re intall your windows- If it is still safe mode also, means the HD is in troublecheck with: scan disk4.
How to Sort the Network cable (UTP)
Mention the steps to make the cable:1. Straight- Prepare the necessary tools to make such kebel Crimping Tool, Cable Cutter, Cable Tester and the necessary materials such as Cable UTP and RJ-45- Cut the wires according to our needs using the crimping tool.- Cut the cord using Cable Cutter skin about 1cm-1.5cm.- Sort the cable colors according to existing formulas, from left to right, the end of A (PO, O, PH, B, PB, H, PC, C) as well as end B (PO, O, PH, B, PB, H, PC, C).- Flatten / cut wires that are color sorted using crimping tool.- Insert the cable into the RJ-45 to RJ-45 head position back to us to actually touch the cable RJ-45 wall.- Make sure the color of cables are arranged properly.- Pinch RJ-45 cable that has been incorporated so that the cable can be locked using a crimping tool powerful to brass contained in the RJ-45 to be flat.- To ensure it is correct, try / test cables using Cable Tester.2. Cross- Prepare the necessary tools to make such kebel Crimping Tool, Cable Cutter, Cable Tester and the necessary materials such as Cable UTP and RJ-45- Cut the wires according to our needs using the crimping tool.- Cut the cord using Cable Cutter skin about 1cm-1.5cm.- Sort the cable colors according to existing formulas, from left to right, the end of A (PO, O, PH, B, PB, H, PC, C) as well as end B (PH, H, PO, B, PB, O, PC, C).- Flatten / cut wires that are color sorted using crimping tool.- Insert the cable into the RJ-45 to RJ-45 head position back to us to actually touch the cable RJ-45 wall.- Make sure the color of cables are arranged properly.- Pinch RJ-45 cable that has been incorporated so that the cable can be locked using a crimping tool powerful to brass contained in the RJ-45 to be flat.- To ensure it is correct, try / test cables using Cable Tester.3. Fumgsi cable1. Straight* Used to connect:- Computers with Switches- Computer with ADSL Modem- Computer with Router- Switch to Switch2. Cross* Used to connect:- Computer to Computermuhammadrafei.blogspot.com
Rabu, 10 Juli 2013
Setting Wireless NanoBridge M5 As Station
before setting up your wireless Nano Bridge M5 you have to change the lan ip address on your laptop, and here I make my laptop ip address 192.168.1.8 ip address while wireless 192.168.1.20 as shown below

This will bring up a menu to enter the login username and password, enter your own username and password as shown below
 Then click on the "wireless" in wireless mode and create a "station" then select "select" scan for access points that we want to konekkan, like in the picture below appears 2 access point and then select the access point you want to connect to your station,


Rabu, 03 Juli 2013
Setting Using Winbox MikroTik
Setting Mikrotik can we know many ways such as using Telnet, SSH, Webbox and Winbox. but of the 4 ways that this time, is Winbox.
Why Using Winbox?
Winbox is running Software and to configure your MikroTik,
Graphic User Interfaces (GUI)
can help us configure MikroTik. And you probably also have not used the command in the terminal, because it uses software.
I will explain about the Winbox.
1. Login to scan MAC Address
Many novice user to use proxy, proxy how to remotely install the first time.
Because the IP address that is used for to MikroTik, then by using Winbox we can remotely by MAC Address, Winbox can recognize the Ethernet Card installed MikroTik system
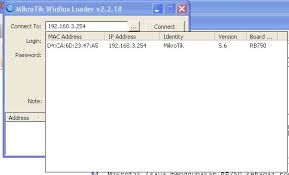
Login with Mac Address
Click the circle that has been in the picture above, using the login "admin" Password "Empty" and Connect ..
Langganan:
Postingan (Atom)